

Validating Forms with Formik + Fonk
Validating Forms with Formik + Fonk
The need
Managing a Form can be darn simple. Just let the user fill in some fields, submit it to the server and if there are any errors notify them and let the user start over again. Is that a good approach? The answer is no, you don't want users to get frustrated waiting for a server round trip to get some form validation result.
Why don't I want users to get frustrated? Because that impacts your business directly; a frustrated client won't complete a purchase, instead they will check your competitor's solution to get a boost up in his productivity, or they'll even sue you for faulty software... long story short, you will end up losing money.

If a user feels comfortable using your application, chances of complete bookings, sales, or processes are way higher.

Now here comes the interesting part... How can I enhance the level of usability of my Forms? You can ask a User Experience expert, and he might give you the following tips (depending on the professional consulted, mileage applies):
- Where: You should notify validation errors inline below related fields.
- When: You should notify errors right after a field has been touched, or after the user hits the submit button (displaying an error message before the user starts typing or right when he is editing a given field can get the user angry I'm not an idiot, let me finish typing this and then validate it...)
- How: You should always let the user hit the submit button and display errors if the validation went wrong. This will be especially important in large or scrolling forms (scroll happens mainly on tablet / mobile devices) where finding a validation error may not be straightforward and the user could feel trapped since he can't progress (submit disabled) or get feedback about what is failing).
- What: Error messages should be clear and you should be able to customize generic error message for certain fields (e.g. a generic RegEx pattern validator message, 'pattern not valid', does not help for an IBAN number; rather, the message should be "Not a valid IBAN number", for a car license plate number it should be "Incorrect car number expected format: .....").
We can even go one step further and add some gamification techniques to this form, e.g. booking.com marks your fields in green once you touched them and they are valid.
On the other hand, as a developer you must ensure that a form is stable and easy to maintain:
- You should be able to read a given form validation definition in a declarative way.
- Testing should be straightforward.
- You should avoid repeating boiler plate code over and over.
- All this code should be homogeneous (easy to reuse and promote as well as help other developers get up to speed).
- There shouldn't be a spaghetti mix with business rules and UI code.
The approach to follow is to industrialize and standardize processes:
- Form state management should be standardized.
- Form validation management should be standardized.
Before starting from scratch, you can check if there already are some solutions implemented for this challenge. In this case we will make use of:
- Form state management: Formik
- Form validation: Fonk plus Fonk Formik
Why searching for already built-in material?
Why look for already built-in material?
- Don't reinvent the wheel, save time and costs.
- These libraries have already covered tons of edge cases.
- They are Stackoverflow friendly.
TL;DR;
Managing Form State (holding field information, check if a control has been touched, if the user has clicked the submit button, who owns the current focus...) can be tedious and prone to errors. We can get help from Formik to handle these challenges for us.
Form validation can get complex (synchronous validations, asynchronous validations, record validations, field validations, internationalization, schemas definitions...). To cope with these challenges we will leverage this into Fonk and Fonk Formik adaptor for a Forkmik seamless integration.
The demo that we are going to implement: link
Github repository: link
If you want to dig into the details keep on reading :).
Managing Form State with Formik
If you want to implement a form with a superb User Experience, you have to take care of many variables:
- Field Values.
- Form state (already submitted?, is it submitting?)
- Check if a field is dirty, or even if it's dirty since the last submit.
- Check if a given field got focus.
- Check if a control has been touched or already visited.
- Check if a control is being validated.
- Integrate all this with a validation system.
You can try to build a solution to tackle these issues on your own, but it will cost you time and money... why not use a battle-tested solution to handle all this complexity? Formik is a great library.
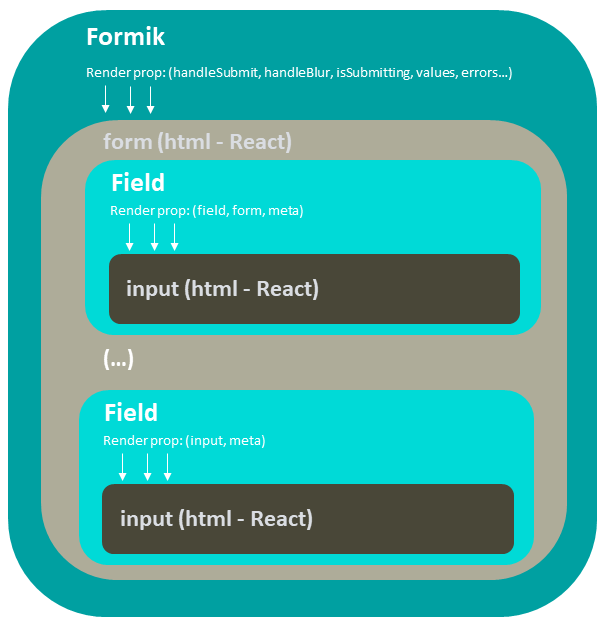
Formik works in a nutshell:
- The main goal of Formik is to colocate get/set values from form state, handle validation and error messages, handle form submission all in one place, by letting Formik keeping these things organized, testing, refactoring and reasoning about forms is easier.
-
It exposes two main components:
- Formik: Allows us to setup initial values, exposes a callback property to trigger validations and what's more important a render prop where you will render your form and fields (this render props feeds us with the following information: handleSubmit, handleBlur, form, isSubmitting, values, touched, errors...)
- Field: Fields live inside a Formik component, they will automatically hook up inputs to Formik. They use the name attribute to match up with Formik state. Field will default to an HTML input element, you can wrap any type of component (e.g Material UI Text Field, a DatePicker...) in a Formik Field via render prop more information in this link
- Formik library also exposes other helpers like ErrorMessage component, to display error validation messages.
You can find a more detailed explanation in this link.
Managing Form Validation with Fonk
On the other hand, handling form validation on your own can be tempting, but you have to cover scenarios like:
- You may want to validate a single field, or run all field validations.
- You may want to add record level validations.
- You may want to fire async validations.
- You may want to execute validations in a given specific order (this can be tricky especially when you have got asynchronous validations).
- You may want to customize validation messages (or give support to i18n).
- You may want to reuse business rules (even promote it to libraries).
- You may want to reuse a list of curated third party validators without having to take the time to learn the signature of each validator.
- You may want to decouple a validation schema definition from its form ui.
- You may want to quickly check which validations apply to a field form without having to deep dive into your component code.
- You may want to easily test validation schemas and rules (e.g. no need to mount the component to implement those tests).
Of course you can start implementing your own thing, but you will waste a lot of precious time reinventing the wheel. Why not take advantage of a validation library that takes care of all this complexity for you?
We have chosen Fonk. Here's why:
- It allows you to easily define a Form Validation Schema in a declarative way
- It allows you to create reusable validators.
- It ships a pluggable curated list of out-of-the-box validators.
- It allows you to combine synchronous and asynchronous validations.
- It allows you to define field and record validations.
- It's a plain vanilla ES6 library, which you can use in React, Vuejs, ...
- It has zero dependencies and the weight is less than 5Kb.
- It is easily extensible (already implemented Final Form and Formik plugin extensions).
Cool, so how does it work?
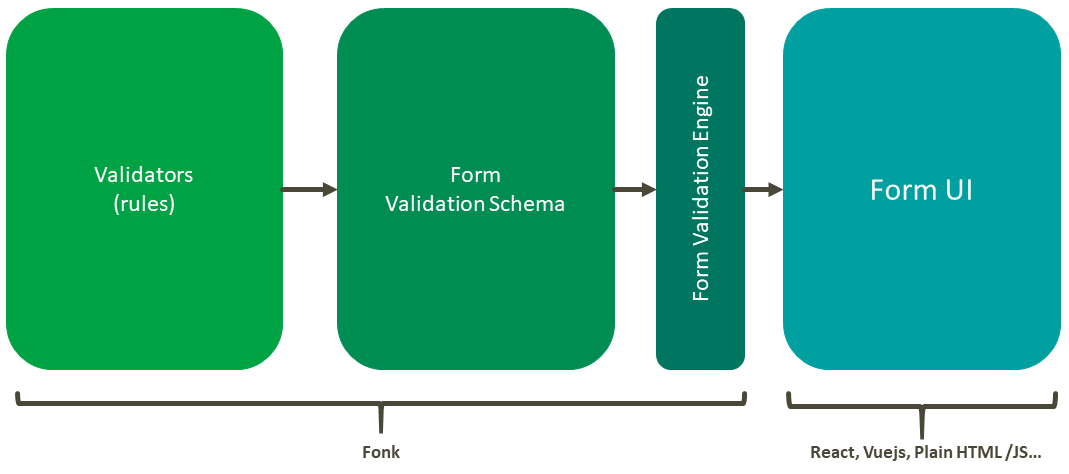
The idea behind Fonk is to encapsulate form validation management and expose four methods to the form ui (in this case Formik):
- validateField: fire the validation rules associated with a given field.
- validateRecord: fire record level validation rules associated with a given form.
- validateForm: fire all the validations associated with a given form (fields and records).
- updateValidationSchema: update the validation schema after creating a form validation instance.

Fonk is divided into three main parts:
- Validators: A validator is just a function that implements a validation rule. It allows you to isolate single validation rules (field and record). Choosing this approach you get the following benefits: you have isolated pieces that do one thing and one thing only, they can be easily tested and they are highly reusable in other forms or can even be shared across libraries.
- Validation Schema: A Form Validation Schema allows you to synthesize all the form validations (a list of validators per form field) into a single object definition. Using this approach you can easily check which validations apply to a given form without having to dig into the UI code.
- ValidationEngine:: The validation engine is the glue between the validation schema and form UI. You instantiate a validation engine passing a given validation schema, then it exposes methods (validateField, validateRecord, validateForm and updateValidationSchema) that can be triggered by the UI form (in this case from React Final Form) and it will return the results of evaluating the validation rules associated.
You can find more information about Fonk in this link plus official documentation in this link
All together
Formik and Fonk integrate seamlessly, there is an specific extension fonk-formik that returns the validation error information in the format expected by Formik
How does it work under the hood:
Initialization:
- Setup the form Validation Schema.
- Instantiate fonk-formik engine.
- Call the fonk engine instance validateForm at Formik component on the validate property.
Firing validations at form level:
- Whenever a field changes, fonk will call the callback defined in the validate property.
- Once the validate property finish its execution it will return the result of the validation errors (null if no errors, or a given entry per fieldId plus error message).
- Formik collects this information.
Showing error information:
- Formik holds the actual error information and exposes it via render props, you can now render it inside the form.
You can fire validations at field level as well.
That was cool! but should I have to stick to Formik and React forever? Formik is a great choice, but you don't have to stick to it. You can reuse Fonk validations in plain React application, or use React Final Form, or even Vue or plain vanilla JavaScript application.
Let's get our hands wet
All the theory is great, but SHOW ME THE CODE !!

Let's implement a Bank Transfer form:
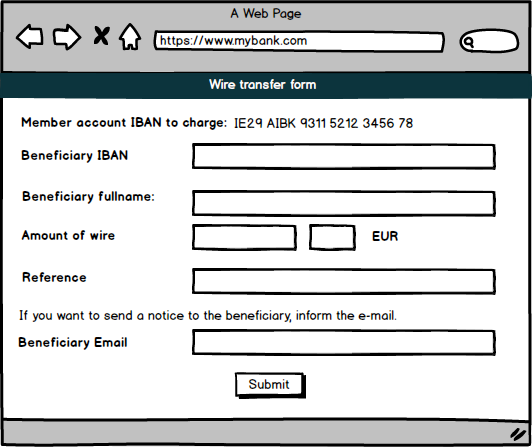
We will start from a boiler plate code that will have:
We will start from a boiler plate code that we have already implemented:
- React project already configured (using create-react-app approach).
- Some fake rest services to simulate asynchronous processes already in place.
You can find all this examples source code available in the following repository
Setting up Formik
We will take as starting point the example 00 Boiler plate
The first step is to setup Formik and build the form layout.
Let's start by installing Formik
npm install formik --saveLet's define a Formik form:
./src/playground.jsx
import React from "react";
import { Formik } from "formik";
export const Playground = () => {
return (
<div>
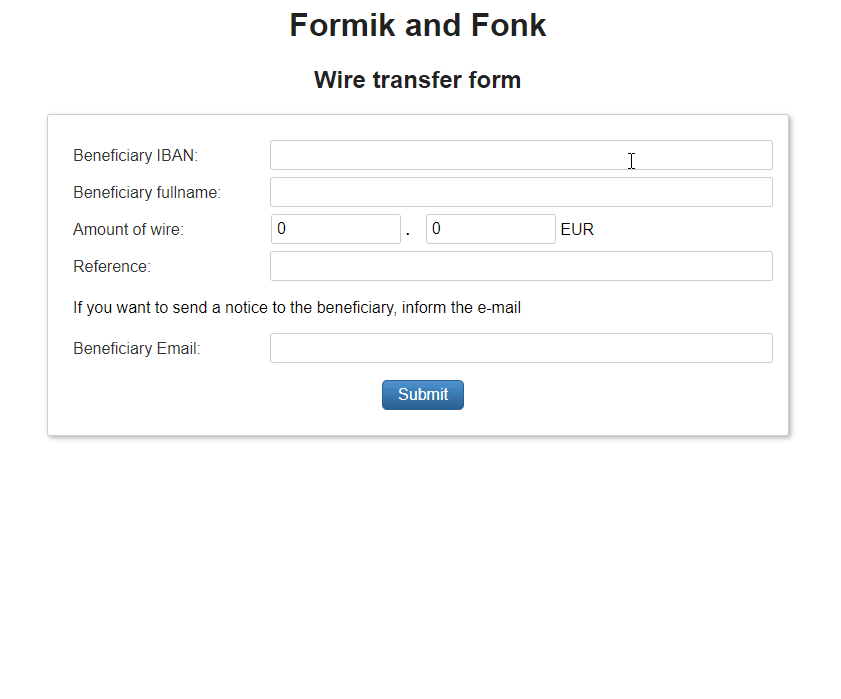
<h1>Formik and Fonk</h1>
<h2>Wire transfer form</h2>
<Formik onSubmit={values => {}}>
{props => {
const {
values,
touched,
errors,
dirty,
handleChange,
handleSubmit
} = props;
return <form onSubmit={handleSubmit}></form>;
}}
</Formik>
</div>
);
};Time to define the initial data:
./src/playground.jsx
...
     <Formik
       onSubmit={(values) => {}}
+       initialValues={{
+         account: '',
+         name: '',
+         integerAmount: 0,
+         decimalAmount: 0,
+         reference: '',
+         email: '',
+       }}
     >
InitialValues listens for changes, if you update this value later one (e.g. data coming from a fetch call) it will automatically update the data in the form.
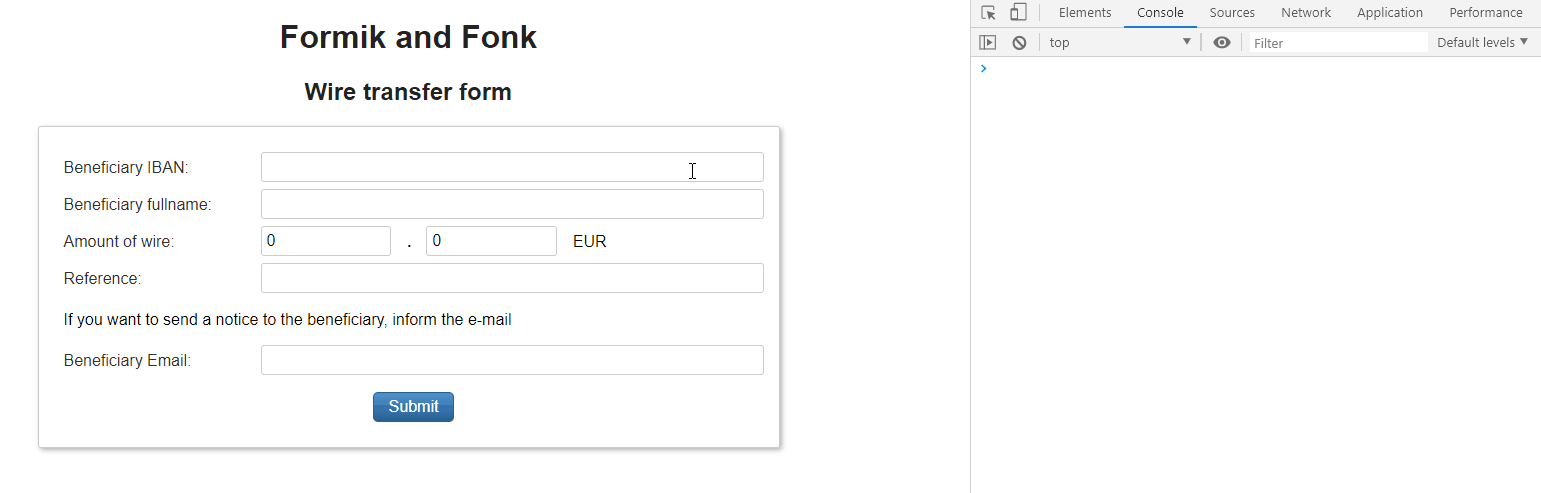
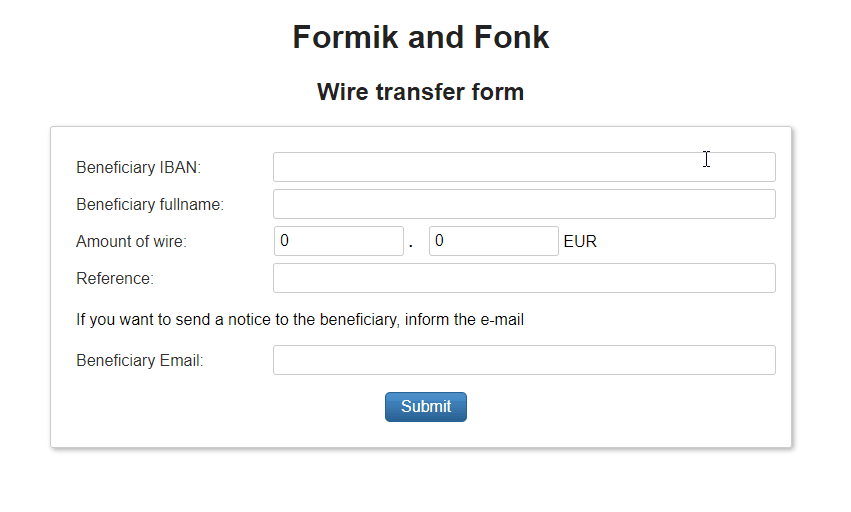
Now that we got the form let's place some fields, inside the render prop:
./src/playground.jsx
- import { Formik } from 'formik';
+ import { Field, Formik } from 'formik';

...
       return (
         <form onSubmit={handleSubmit}>
+              <Field name="account">
+                {({ field }) => (
+                  <div>
+                    <label>Beneficiary IBAN:</label>
+                    <input {...field} />
+                  </div>
+                )}
+              </Field>
+              <Field name="name">
+                {({ field }) => (
+                  <div>
+                    <label>Beneficiary fullname:</label>
+                    <input {...field} />
+                  </div>
+                )}
+              </Field>
+              <div>
+                 <label>Amount of wire:</label>
+                 <Field name="integerAmount" type="number">
+                   {({ field }) => <input {...field} className="amount-field" />}
+                 </Field>
+                 <strong>.</strong>
+              <Field name="decimalAmount" type="number">
+                {({ field }) => (
+                  <>
+                    <input {...field} className="amount-field" />
+                    <label>EUR</label>
+                  </>
+                )}
+              </Field>
+           </div>
+           <Field name="reference">
+             {({ field }) => (
+                <div>
+                  <label>Reference:</label>
+                  <input {...field} />
+                </div>
+             )}
+           </Field>
+           <p>
+             If you want to send a notice to the beneficiary, inform the e-mail
+           </p>
+           <Field
+             name="email">
+             {({ field }) => (
+                <div>
+                  <label>Beneficiary Email:</label>
+                  <input {...field} />
+                </div>
+             )}
+           </Field>
         </form>
       )}
Things to take into consideration:
- Field and render prop, by default wraps an HTML input, but you can define any component inside that Field render prop (the last example in this post shows you how to combine Material UI components with Formik)
- Usually you create a set of wrappers for your component library (check material UI wrappers in the last example of this post).
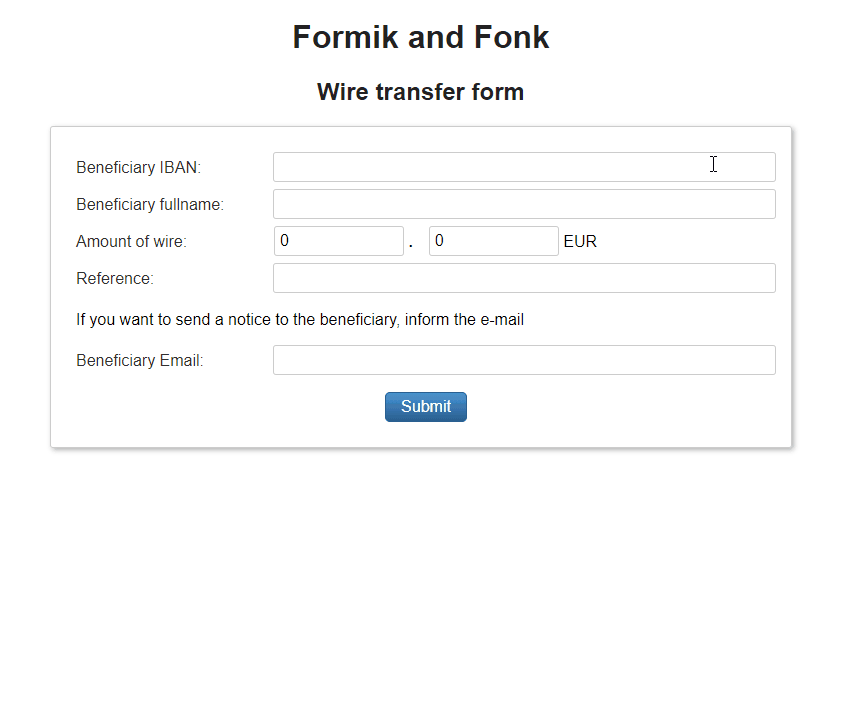
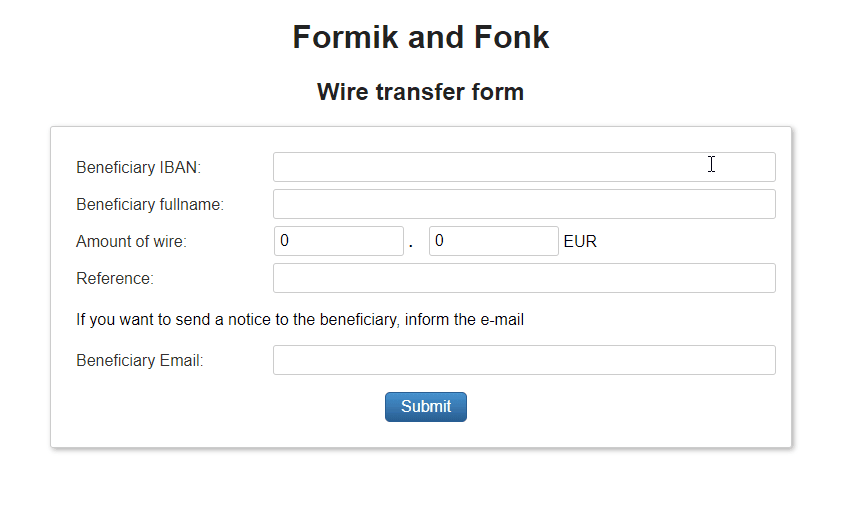
Let's add some code to handle the submit button (we will make a console.log showing the field values).
./src/playground.jsx
...
...
      <Formik
-       onSubmit={() => {}}
+       onSubmit={values => {
+         console.log({ values });
+       }}
        initialValues={{
          account: '',
          name: '',
          integerAmount: 0,
          decimalAmount: 0,
          reference: '',
          email: '',
        }}
        render={({ handleSubmit }) => (
          <form onSubmit={handleSubmit}>
            ...
            <Field name="email">
              {({ input }) => (
                <div>
                  <label>Beneficiary Email:</label>
                  <input {...input} />
                </div>
              )}
            </Field>
+           <div className="buttons">
+             <button type="submit">Submit</button>
+           </div>
          </form>
        )}
      />
Let's test this:
We made great progress, but there's one problem: we can hit submit but we won't validate anything on the client's side, behavior which will frustrate the final user.
Let's start our validation journey
Setting up the validation plumbing
We want to add client side validation support in our form. Let's start by installing fonk and fonk-formik extension.
npm install @lemoncode/fonk @lemoncode/fonk-formik --saveNow let's define an empty form validationSchema and create an instance of Fonk validation engine passing as parameter the already created validation schema as parameter.
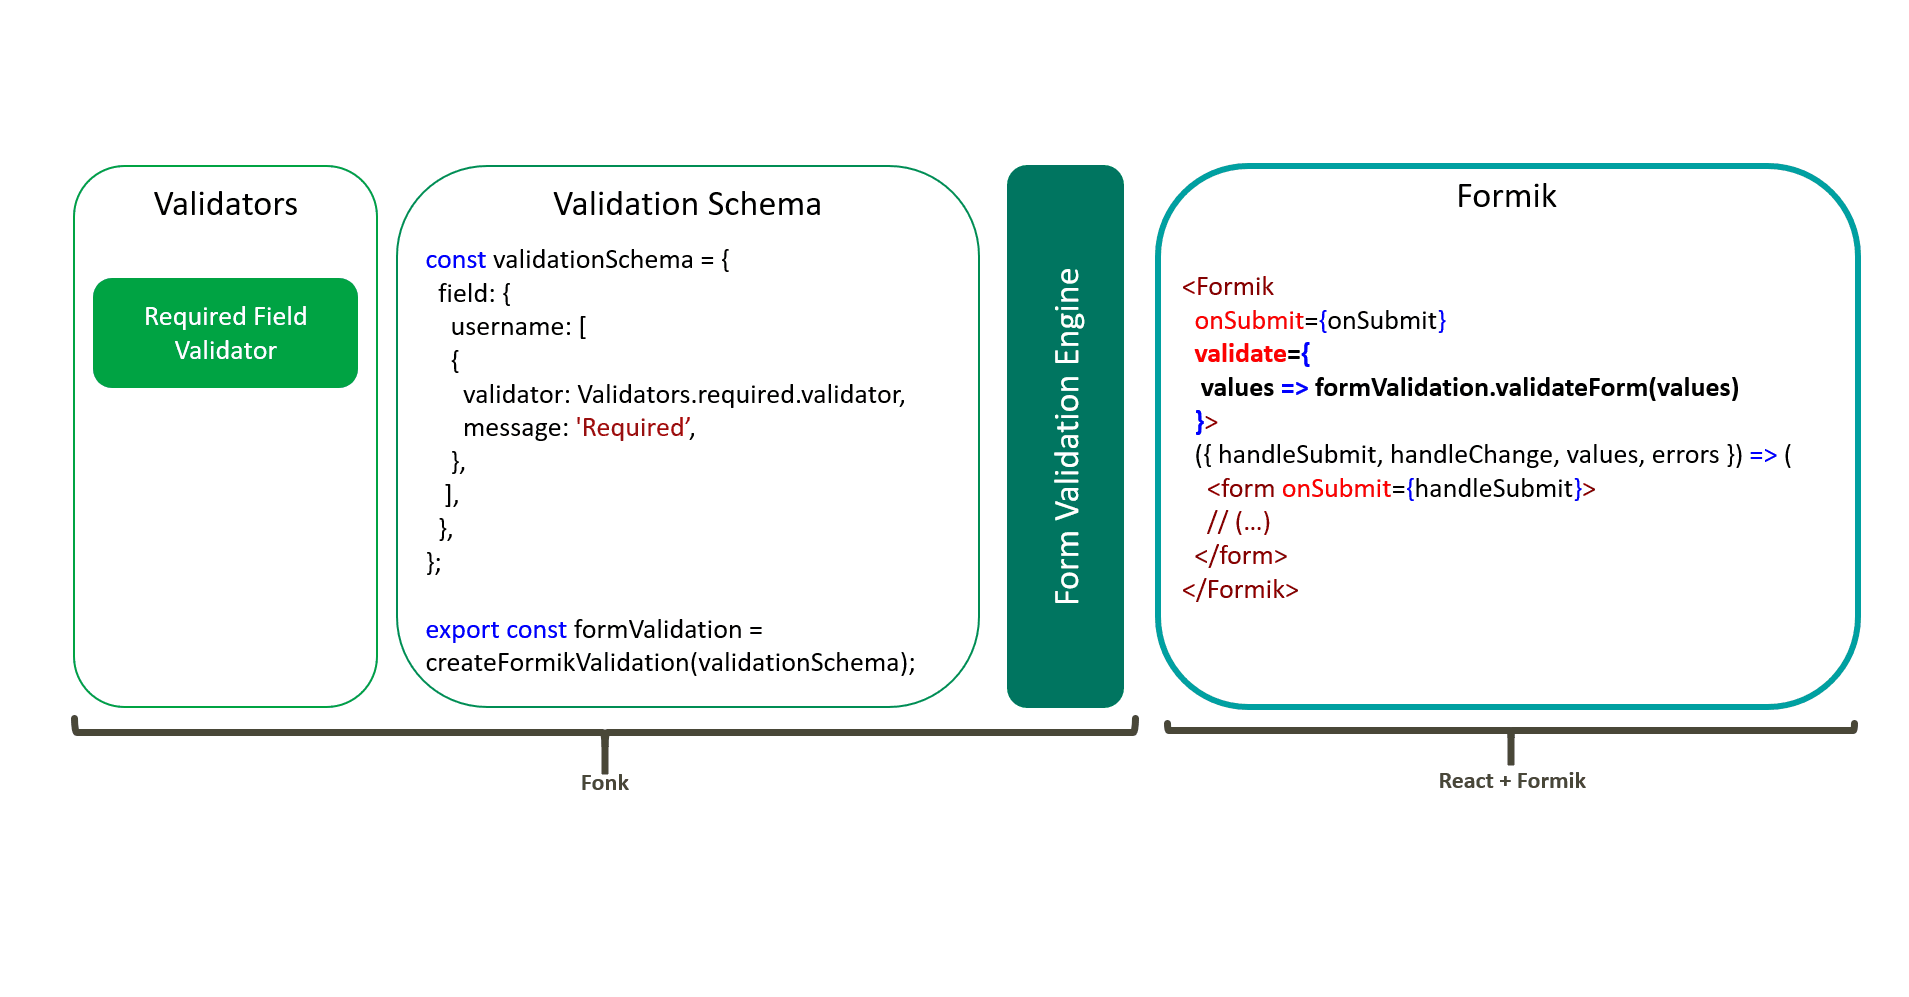
./src/form-validation.js
import { createFormikValidation } from "@lemoncode/fonk-formik";

const validationSchema = {};

export const formValidation = createFormikValidation(validationSchema);
We've got everything we need, so let's wire up this validation engine instance into Formik:
import React from 'react';
import { Field, Formik } from 'formik';
+ import { formValidation } from './form-validation';

...
      <Formik
        onSubmit={values => {
          console.log({ values });
        }}
+        validate={(values) => formValidation.validateForm(values)}
        initialValues={{
It's time to create some validations.
Standard validations
In our bank transfer form we want the following fields to be required:
- Beneficiary IBAN.
- Beneficiary full name.
- Amount of wire.
- Reference.
- Beneficiary Email.
Let's add these constraints to our form validation schema:
./src/form-validation.js
+ import { Validators } from '@lemoncode/fonk';
import { createFormikValidation } from '@lemoncode/fonk-formik';

const validationSchema = {
+ field: {
+   account: [Validators.required],
+   name: [Validators.required],
+   integerAmount: [Validators.required],
+   decimalAmount: [Validators.required],
+   reference: [Validators.required],
+   email: [Validators.required],
+ },
};

export const formValidation = createFormikValidation(validationSchema);
Let's display the error information inline in the form components:
./src/playground.jsx
import React from 'react';
- import { Field, Formik } from 'formik';
+ import { Field, Formik, ErrorMessage } from 'formik';
import { formValidation } from './form-validation';

...

          return (
            <form onSubmit={handleSubmit}>
              <Field name="account">
                {({ field }) => (
                  <div>
                    <label>Beneficiary IBAN:</label>
                    <input {...field} />
                  </div>
                )}
              </Field>
+              <ErrorMessage component="span" name="account" />
              <Field name="name">
                {({ field }) => (
                  <div>
                    <label>Beneficiary fullname:</label>
                    <input {...field} />
                  </div>
                )}
              </Field>
+              <ErrorMessage component="span" name="name" />
              <div>
                <label>Amount of wire:</label>
                <Field name="integerAmount" type="number">
-                  {({ field }) => <input {...field} className="amount-field" />}
+                  {({ field }) =>
+                    <div className="amount-field">
+                      <input {...field} className="amount-field" />
+                      <ErrorMessage component="span" name="integerAmount" />
+                      </div>
+                  }
                </Field>
                <strong>.</strong>
                <Field name="decimalAmount" type="number">
                  {({ field }) => (
                   <>
+                    <div className="amount-field">
                      <input {...field} className="amount-field" />
+                     <ErrorMessage component="span" name="decimalAmount" />
+                     </div>
                      <label>EUR</label>
                    </>

                  )}
                </Field>
+              <ErrorMessage component="span" name="decimalAmount" />
              </div>
              <Field name="reference">
                {({ field }) => (
                  <div>
                    <label>Reference:</label>
                    <input {...field} />
                  </div>
                )}
              </Field>
+              <ErrorMessage component="span" name="reference" />
              <p>
                If you want to send a notice to the beneficiary, inform the
                e-mail
              </p>
              <Field name="email">
                {({ field }) => (
                  <div>
                    <label>Beneficiary Email:</label>
                    <input {...field} />
                  </div>
                )}
              </Field>
+              <ErrorMessage component="span" name="email" />
              <div className="buttons">
                <button type="submit">Submit</button>
              </div>
            </form>
          );
        }}
What are we doing here? Display the error message only if an error has been reported for the given field and component has been 'touched' (touched means: user set focus on the component and jumped into another component, lost focus).
Now if we run the sample we can check if we get error messages as soon as we enter content in the field and fields are touched
Fair enough, but I need to check for other business rules Yup, let's move forward.
Fonk has some built-in validators (email, pattern, ...). Let's validate that the beneficiary email field is a valid email
./src/form-validation.js
...
const validationSchema = {
  field: {
    account: [Validators.required],
    name: [Validators.required],
    integerAmount: [Validators.required],
    decimalAmount: [Validators.required],
    reference: [Validators.required],
    email: [
      Validators.required,
+     Validators.email
    ],
  },
};
...
Note down: we don't need to add anything else on the UI code, everything is already wired up. We only need to worry about adding our business rules (validators) to the ValidationSchema.
What about the [IBAN](https://en.wikipedia.org/wiki/InternationalBankAccountNumber) number validation? Do I have to write my own validator?_ Fortunately Fonk has an ecosystem of validators that can save us some time coding, in this case we have an IBAN validator at our disposal, let's install it:
npm install @lemoncode/fonk-iban-validator --saveAnd let's use it in our schema
./src/form-validation.js
import { Validators } from '@lemoncode/fonk';
import { createFormikValidation } from '@lemoncode/fonk-formik';
+ import { iban } from '@lemoncode/fonk-iban-validator';

const validationSchema = {
  field: {
    account: [
      Validators.required,
+     iban,
    ],
    ...
  },
};
...
Why aren't these validators enclosed in the library? We prefer the approach of exposing microlibraries and letting you use them as in a buffet (no need to add extra noise if it's not necessary).
Let's jump into another interesting validator, the use cases:
- We want the euros amount field to be greater than 0 and less than 10.000 €.
- We want the cents amount field to be greater than 0 and less than 99.
There is another third party validator available fonk-range-number-validator
npm install @lemoncode/fonk-range-number-validator --saveLet's add them to our ValidationSchema
./src/form-validation.js
import { Validators } from '@lemoncode/fonk';
import { createFormikValidation } from '@lemoncode/fonk-formik';
import { iban } from '@lemoncode/fonk-iban-validator';
+ import { rangeNumber } from '@lemoncode/fonk-range-number-validator';

const validationSchema = {
  field: {
    ...
    integerAmount: [
      Validators.required,
+     {
+       validator: rangeNumber,
+       customArgs: {
+         min: {
+           value: 0,
+           inclusive: true,
+         },
+         max: {
+           value: 10000,
+           inclusive: true,
+         },
+       },
+     },
    ],
    decimalAmount: [
      Validators.required,
+     {
+       validator: rangeNumber,
+       customArgs: {
+         min: {
+           value: 0,
+           inclusive: true,
+         },
+         max: {
+           value: 99,
+           inclusive: true,
+         },
+       },
+     },
    ],
    ...
  },
};
...
As you can see this validator accepts custom params, which allows us to implement flexible business rules.
Just to wrap up this section, let's end with disabling wire transfers. If the IBAN country code belongs to France (imagine that there are some temporary technical issues and you cannot perform that operation on the server side), you can easily implement this using the built-in pattern validator (RegEx):
./src/form-validation.js
...

const validationSchema = {
  field: {
    account: [
      Validators.required,
      iban,
+     {
+       validator: Validators.pattern,
+       customArgs: {
+         pattern: /^(?!FR)/i,
+       },
+       message: 'Not available transfers to France',
+     },
    ],
    ...
Note down: we are placing this validation at the end of the validators array for the IBAN field, doing so we ensure that we only run this validation once the field has been informed and it's a well-formed IBAN.
The final result is looking great; we have coded a lot of business rules without having to worry about the UI.
Where can I find a complete list of validators already implemented? click here to check the list of built-in validators and here to check the third party validators
Synchronous custom field validations
Ok, I have seen that there are lot of built-in and third party validations, but sooner or later I will face a validation rule not covered by this buffet. Can I build a custom one? Of course you can! Let's take the case of disabling wire transfers for a given country as a startimg point, but let's add an extra requirement: What if we want to pass a list of countries prefix? E.g. there are temporary issues for IBAN numbers belonging to Germany and France, so we want to pass an array of country prefixes. It's time to create our own validator:
We will implement a very basic one. For a complete guide about implementing custom synchronous validators click on this link
./src/custom-validators/country-black-list.validator.js
import { Validators } from "@lemoncode/fonk";

export const countryBlackList = ({ value, customArgs }) => {
  const { countries } = customArgs;

  const countriesRegExp = countries.reduce(
    (regex, country, i) => (i === 0 ? `(${country})` : `${regex}|(${country})`),
    ""
  );
  const pattern = new RegExp(`^(?!${countriesRegExp})`, "i");

  const { succeeded } = Validators.pattern.validator({
    value,
    customArgs: { pattern }
  });

  return {
    type: "COUNTRY_BLACK_LIST",
    succeeded,
    message: succeeded ? "" : "This country is not available"
  };
};
Let's instantiate it in our schema (for instance let's disable France and Spain)
./src/form-validation.js
import { Validators } from '@lemoncode/fonk';
import { createFormikValidation } from '@lemoncode/fonk-formik';
import { iban } from '@lemoncode/fonk-iban-validator';
import { rangeNumber } from '@lemoncode/fonk-range-number-validator';
+ import { countryBlackList } from './custom-validators';

const validationSchema = {
  field: {
    account: [
      Validators.required,
      iban,
-     {
-       validator: Validators.pattern,
-       customArgs: {
-         pattern: /^(?!FR)/ig,
-       },
-       message: 'Not available transfers to France',
-     },
+     { validator: countryBlackList, customArgs: { countries: ['FR', 'ES'] } },
    ],
    ...
What would happen if we get the list from a rest api when the form component is mounted? That's an interesting topic, you can add a rule once a component has been mounted and update the associated validation schema.
Let's first remove the rule from the ValidationSchema:
./src/form-validation.js
import { Validators } from '@lemoncode/fonk';
import { createFormikValidation } from '@lemoncode/fonk-formik';
import { iban } from '@lemoncode/fonk-iban-validator';
import { rangeNumber } from '@lemoncode/fonk-range-number-validator';
- import { countryBlackList } from './custom-validators';

- const validationSchema = {
+ export const validationSchema = {
  field: {
    account: [
      Validators.required,
      iban,
-     { validator: countryBlackList, customArgs: { countries: ['FR', 'ES'] } },
    ],
    ...
Let's add it to the schema after a fetch call to getDisabledCountryIBANCollection is completed.
./src/playground.jsx
import React from 'react';
import { Form, Field } from 'formik';
- import { formValidation } from './form-validation';
+ import { formValidation, validationSchema } from './form-validation';
+ import { getDisabledCountryIBANCollection } from './api';
+ import { countryBlackList } from './custom-validators';

export const Playground = () => {
+ React.useEffect(() => {
+   getDisabledCountryIBANCollection().then(countries => {
+     const newValidationSchema = {
+       ...validationSchema,
+       field: {
+         ...validationSchema.field,
+         account: [
+           ...validationSchema.field.account,
+           {
+             validator: countryBlackList,
+             customArgs: {
+               countries,
+             },
+           },
+         ],
+       },
+     };

+     formValidation.updateValidationSchema(newValidationSchema);
+   });
+ }, []);

  return (
    <div>
      <h1>React Final Form and Fonk</h1>
      <h2>Wire transfer form</h2>
      <Form
      ...
Asynchronous custom field validations
Implementing custom synchronous validations is great, but what about asynchronous ones? Let's check how to do this by coding an example: In this case once the user has entered a valid IBAN, we want to check against the server if that IBAN number belongs to a blacklist. We have the following fake simulation of a rest api call already implemented:
./src/api.js
const mockIBANBlackList = ["BE71 0961 2345 6769"];

export const isIBANInBlackList = iban =>
  Promise.resolve(mockIBANBlackList.includes(iban));
We can write our own custom validator:
./src/custom-validators/iban-black-list.validator.js
import { isIBANInBlackList } from "../api";

export const ibanBlackList = ({ value }) =>
  isIBANInBlackList(value).then(isInBlackList => ({
    type: "IBAN_BLACK_LIST",
    succeeded: !isInBlackList,
    message: isInBlackList ? "This IBAN is not allowed" : ""
  }));
And add it to our schema:
./src/form-validation.js
import { Validators } from '@lemoncode/fonk';
import { createFormikValidation } from '@lemoncode/fonk-formik';
import { iban } from '@lemoncode/fonk-iban-validator';
import { rangeNumber } from '@lemoncode/fonk-range-number-validator';
+ import { ibanBlackList } from './custom-validators';

export const validationSchema = {
  field: {
    account: [
      Validators.required,
      iban,
+     ibanBlackList,
    ],
    ...
That's all, no need to update the UI, no need to know whether the validator is synchronous or asynchronous.
Let's check how far we have gone:
Custom record validations
Well, we've had a great time adding field validations, but there are validations that are tied up to the whole record we are editing rather than to a given field. For instance, let's face this scenario: You are not allowed to transfer more than 1000 € to Switzerland using this form (for instance: you have to go through another form where some additional documentation is required).
The best place to fire this validation is at record level.
Record validation functions accept the whole form record info as input parameter, and return the result of the validation (it accepts both flavours sync and promise based). Let's check the code for this validator:
./src/custom-validators/switzerland-transfer.validator.js
import { Validators } from "@lemoncode/fonk";

const isSwitzerlandAccount = value => {
  const pattern = /^CH/i;
  const { succeeded } = Validators.pattern.validator({
    value,
    customArgs: { pattern }
  });
  return succeeded;
};

export const switzerlandTransfer = ({ values }) => {
  const succeeded =
    !isSwitzerlandAccount(values.account) ||
    Number(values.integerAmount) < 1000 ||
    (Number(values.integerAmount) === 1000 &&
      Number(values.decimalAmount) <= 0);

  return {
    type: "SWITZERLAND_TRANSFER",
    succeeded,
    message: succeeded
      ? ""
      : "Not allowed to transfer more than 1000 € in Swiss account"
  };
};
In order to set it up in our form validation schema there is a section called record where we can add our validation:
./src/form-validation.js
import { Validators } from '@lemoncode/fonk';
import { createFormikValidation } from '@lemoncode/fonk-formik';
import { iban } from '@lemoncode/fonk-iban-validator';
import { rangeNumber } from '@lemoncode/fonk-range-number-validator';
- import { ibanBlackList } from './custom-validators';
+ import { ibanBlackList, switzerlandTransfer } from './custom-validators';

export const validationSchema = {
  field: {
    ...
  },
+ record: {
+   switzerlandTransfer: [switzerlandTransfer],
+ },
};

export const formValidation = createFinalFormValidation(validationSchema);
Now let's add some plumbing in the UI code to display the record error message (it will only be displayed once IBAN and Amount fields have been touched).
./src/playground.jsx
...
      <Formik
        ...
          <form onSubmit={handleSubmit}>
            ...
            </Field>
+           {errors.recordErrors && errors.recordErrors.switzerlandTransfer && (
+             <span>{errors.recordErrors.switzerlandTransfer}</span>
+           )}
            <div className="buttons">
              <button type="submit">Submit</button>
            </div>
          </form>
        )}
      />
    </div>
  );
};
Let's check this out in action:
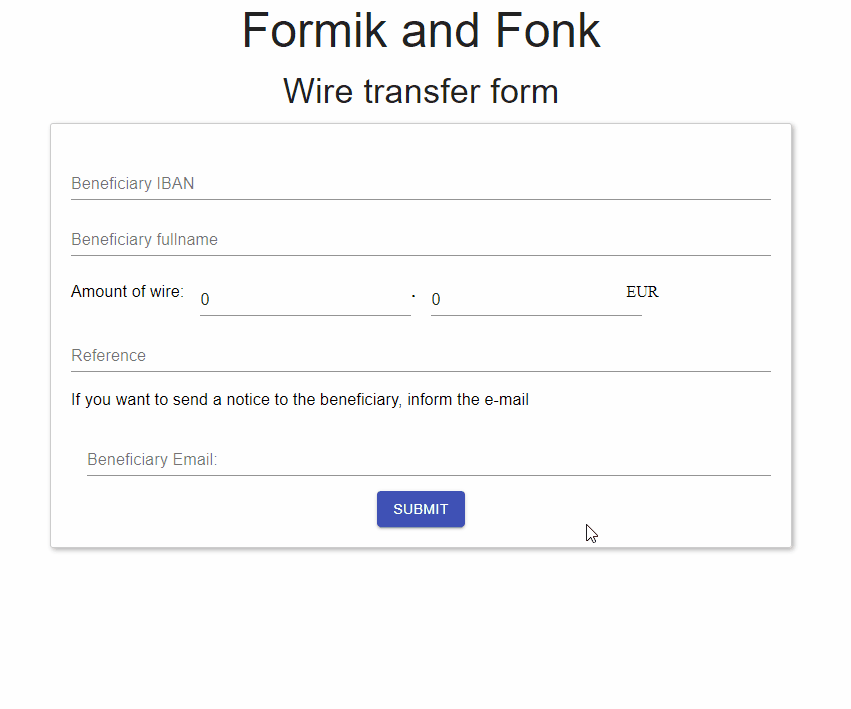
What about material ui
Working with HTML plain vanilla controls is good enough if you want to learn how the libraries work without adding additional noise, but in real life projects you use a set of components libraries, advanced custom components... How can we integrate these components with Formik + Fonk?
- The Formik field component exposes a render prop where you can use your own custom component.
- This render prop feeds the inner content with several args that will let you wire up your custom component with Formik
- What you usually do in a real project is create a wrapper per component, so that you don't have to worry about repeating your connection plumbing in every single form.
Below you will find the same example as built before but now using Material UI
Resources
Example material, GitHub repository
Full example working codesandbox
If you want to learn more about Formik:
- Formik GitHub repository
- Formik Documentation
- React Alicante session
If you want to learn more about Fonk:
- Fonk GitHub repository
- Fonk Fonk Formik GitHub repository
- Fonk Documentation
- Blog post Hello Fonk
- i18n + Fonk example codesandbox
Wrapping up
Standarizing Form State Management + From Validation can add a lot of value to your solution, benefits that you get:
- Focus on your application: forget about forms details like I'm dirty, field touched...
- Separation of concerns: You will avoid having your business logic being tied up to the UI.
- Reusability: you can take advantage of many already built in validations, and you can easily promote your custom validations to reusable ones.
- Flexibility: your solution can be ported to other UI's, or you can replace your favourite state management form library without affecting your validation engine.
- Ubiquity: you can also run your validation on the server side (e.g. nodejs)
- Industrialization: You can easily chop your form validations into smaller independent pieces that can be developed by separate teams in paralell with no dependencies.
About Basefactor
We are a team of Front End Developers. If you need training, coaching or consultancy services, don't hesitate to contact us.
Doers/
Location/
C/ Pintor Martínez Cubells 5 Málaga (Spain)
General enquiries/
info@lemoncode.net
+34 693 84 24 54


Copyright 2018 Basefactor. All Rights Reserved.

