

Hello Docker !!
Hello Docker!!
Docker has left behind its "buzzword" time. By now it has been deeply incorporated by the industry due to its simplicity for packaging applications and later running applications, especially in distributed systems. In the cloud, Docker avoids having to install tons of dependencies, which makes it really easy to upgrade production systems and their maintenance.
If (almost) everyone is running their applications using containers, especially Docker, I bet you want to learn it, too, right?
What is a (Linux) container?
A container is a set of processes which will only have access to some resources of the machine where they are running. In order to get it to work, some utilities of Linux Kernel are used, for instance cgroups and namespaces. The most widely used Container Run Time is Docker. Docker is an open platform for developers and sysadmins to build, ship and run applications inside software containers.
In English, a container is a way to package your application ensuring that it is going to behave in the same way no matter where it runs.
Advantages
Containers help us package our applications with all their dependencies, ensuring that the context where they run will always be the same and thus, avoiding errors.
Microservices systems tend to become polyglot, increasing the challenges in the building and deployment phases. If the applications are containerized, all the applications will speak a common language in terms of running or deployment, facilitating the work in the operations department.
Besides, some container platforms - like Docker - provide distribution systems - like Docker repositories - which we can use to store and distribute our applications.
Therefore, if we use containers, they will help us package, distribute and run our applications.
Installation
If you haven't installed Docker CE yet, here are the links per OS:
Windows
- You can find out how to install Docker CE for windows here Windows installation guide
- Direct Docker CE download Docker CE download
MacOS
- You can find out how to install Docker CE for MacOS here MacOS installation guide
- Direct Docker CE download Docker CE download
Linux
- Centos installation guide
- Debian installation guide
- Fedora installation guide
- Ubuntu installation guide
- Binaries installation guide
Agenda
This article will cover how to containerize a distributed application using Docker.
- Dockerize backend solution, create Dockerfile and .dockerignore files.
- Build Docker backend image.
- Run Docker backend container from build.
- Dockerize frontend solution, using a multistage build. We will include nginx as frontend server as well.
- Build Docker frontend image.
- Run Docker frontend container from build.
- Create a multi container infrastructure managed by Docker Compose.
Example
A Chat app will be taken as an example. The application is split into two parts: client (front-end) and server (backend), which will be containerized using Docker and deployed using Docker containers.
We already have a couple of repositories which will create a chat application together.
In order to test it locally, a third part will also be included: a load balancer, whose responsibility will be to route the traffic to the front or back depending on the requesting url. The load balancer will also be containerized and deployed using a Docker container.
As we are working with several containers, we will eventually introduce docker-compose, a tool which will help us work with our multi-container environment.
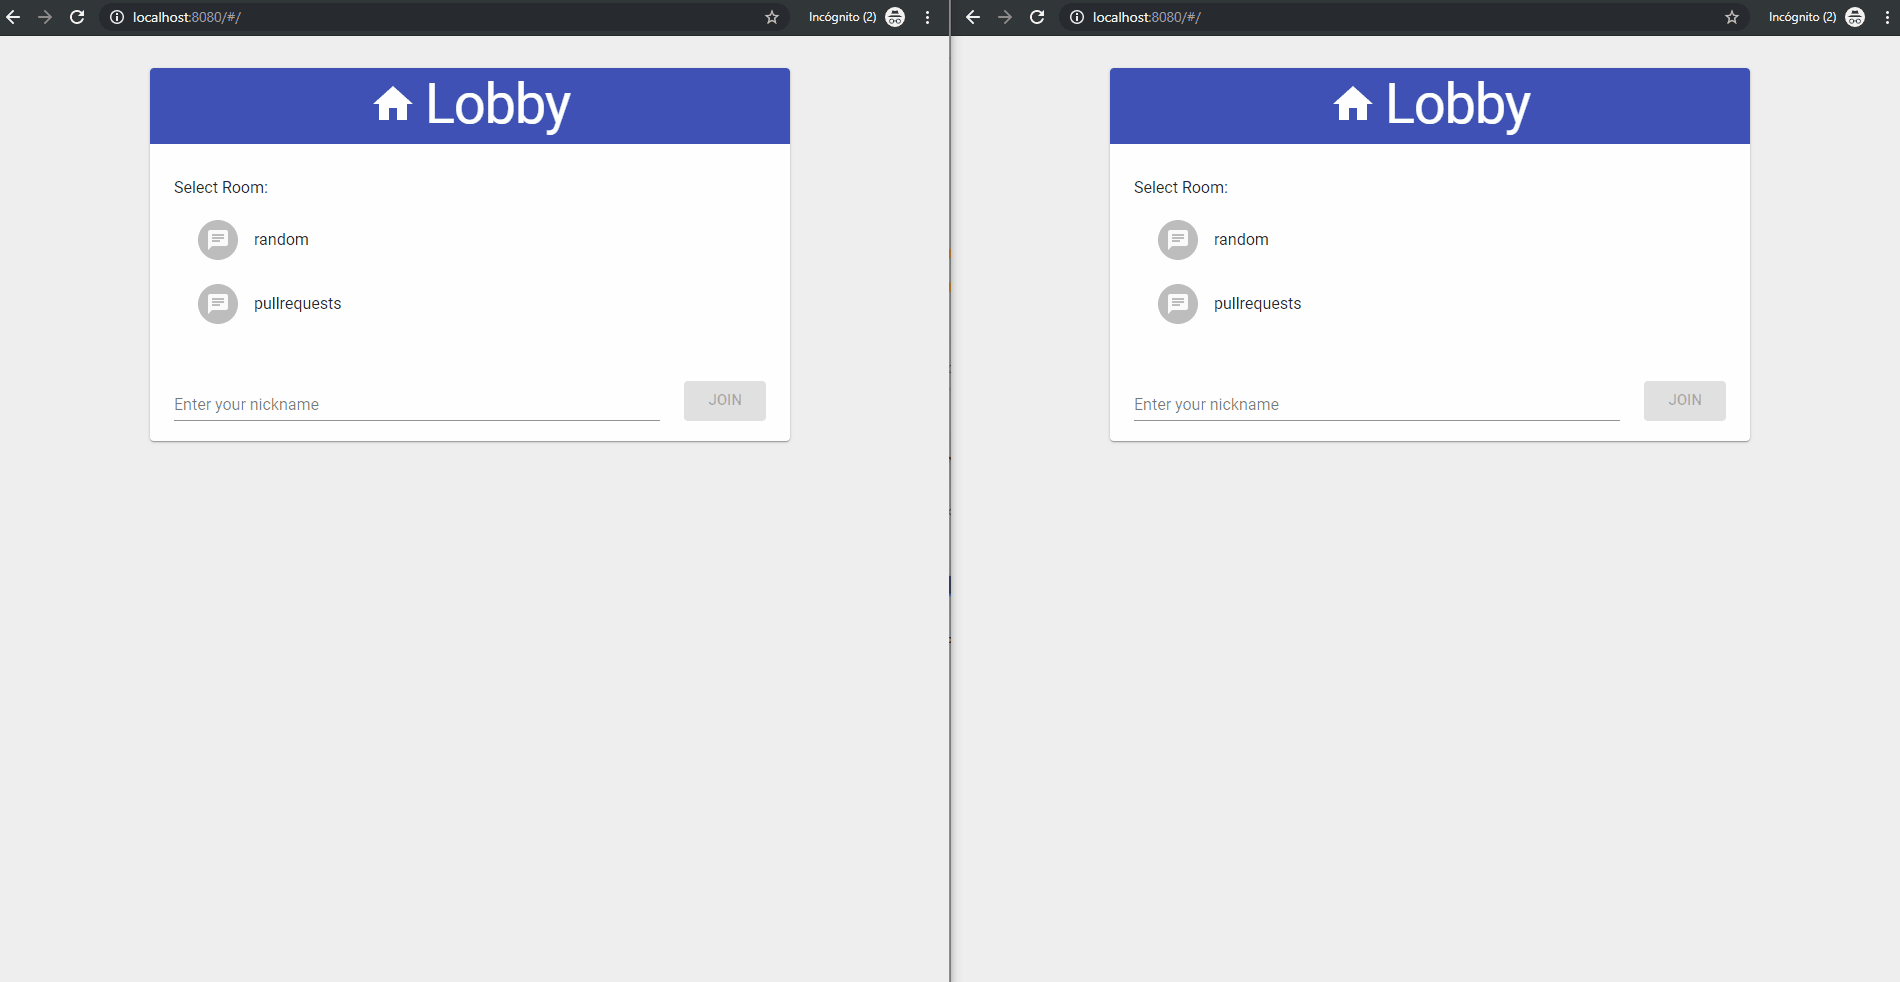
To check if back and front applications are working:
- Clone both repositories, clone them as siblings in the same root folder.
.
├── container-chat-back-example
└── container-chat-front-example- From root folder on both applications
npm install- Now we have to open two terminals (in one of them access to container-chat-back-example) and we can start the backend just with:
npm start- In the other terminal access to container-chat-front-example, and start front application:
npm start- Visit http://localhost:8080, now we can introduce a nickname, select a room and start to chat.
- We can open multiple browser instances (with different nicknames), and see how the messages in the same room print out in real time.
Docker Images Overview
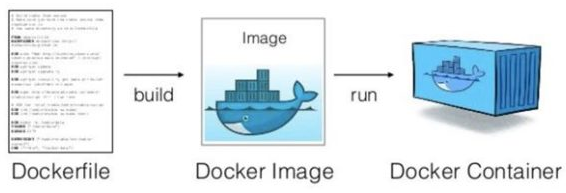
We have been talking about containers, but there is still a long way to go to get a container up and running. A Docker container is launched using a Docker Image which is a read-only template with the commands to execute a container. We can use this template to launch as many containers as we need.
How can I build a Docker Image?
A Docker image needs a file, usually called Dockerfile, where we will write down all the steps to build it. Building a Docker image is a composition process, where we begin from an already built Docker image and we modify it, adding code, compiling code, ..., and indicating how to execute our application. Every step produces an intermediate image called a layer. There are some reserved words, for instance:
- FROM: To take a Docker image as base.
- COPY/ADD: To copy files from your host to the image.
- RUN: To execute commands.
- CMD/ENTRYPOINT: To indicate how to run your application and thus, start the container.
Dockerfile is usually located at root folder level of the project and it looks like the following example:
FROM node
COPY src/ app/
RUN npm install
CMD ["npm", "start"]
Once you have your Dockerfile ready, you can build the Docker image running the following command from the application folder:
$ docker build -t mydockerimage.If your Docker image was correctly built, you can use it to launch containers.
Backend
From a functional point of view our backend app is a chat server. The backend application is an express application that is using socket.io to give support to websockets.
The backend application is going to be containerized using Docker, therefore the first step is to create a Dockerfile file on the root folder of the project. It will contain the steps to produce the Docker image.
- Indicate base image
- Establish a working directory
- Copy the code
- Install dependencies
- "Expose" port
- Indicate how to start the application
In order to avoid adding files/folders to the image that we do not want, we can create a file called .dockerignore on the root of the folder and write down their names:
./container-chat-back-example/.dockerignore
node_modules/
.gitignore
Dockerfile
License
test/
e2e/
1. Indicate Base Image
As we have mentioned before, the construction of a Docker image always requires a base image. In our case we are going to choose node image. A vast amount of public images can be found in Docker Hub.
./container-chat-back-example/Dockerfile
+ FROM node2. Set Working Directory
The next step is to establish a working directory which will be used to locate our code. In our case, we are going to choose /opt/back. Remember that you have to use Linux file system.
./container-chat-back-example/Dockerfile
FROM node
+ WORKDIR /opt/back
3. Copy The Code
As we have created our .dockerignore file to avoid copying what we do not want, and we have established a working directory, copying our code is as easy as pie:
./container-chat-back-example/Dockerfile
FROM node
WORKDIR /opt/back
+ COPY . .
4. Install Dependencies
After having our code, we have to install the dependencies like we would do locally: npm install. We need to use the reserved word RUN.
./container-chat-back-example/Dockerfile
FROM node
WORKDIR /opt/back
COPY . .
+ RUN npm install
5. "Expose" Port
EXPOSE reserved words do not actually expose any port. It's a kind of documentation between the developer who writes the Dockerfile and the developer who is going to run the container. The developer who will run the container will have the necessary knowledge to map the ports between the container and the host.
./container-chat-back-example/Dockerfile
FROM node
WORKDIR /opt/back
COPY . .
RUN npm install
+ EXPOSE 3000
6. Indicate How To Start The Application
The last step is to indicate to Docker how to start the application and thus, the container. In this case, we are going to use the reserved word ENTRYPOINT and the command. The command has been explicited following the pattern ["executable", "param"].
./container-chat-back-example/Dockerfile
FROM node
WORKDIR /opt/back
COPY . .
RUN npm install
EXPOSE 3000
+ ENTRYPOINT ["npm", "start"]
The final Dockerfile should look like this:
./container-chat-back-example/Dockerfile
FROM node
WORKDIR /opt/back
COPY . .
RUN npm install
EXPOSE 3000
ENTRYPOINT ["npm", "start"]
Dockerfile Summary
- FROM node We're setting the base image from node
- WORKDIR /opt/back We're setting the work directory on /opt/back.
- COPY . . Copy content in container. The point where it is copied will be on selected working directory /opt/back.
- RUN npm install Add dependencies.
- EXPOSE 3000 Notification about what port is going to expose our app.
- ENTRYPOINT ["npm", "start"] Command to start our container.
If you want to learn more about the commands used here check our post resources section.
The structure of the folder would be:
.
├── Dockerfile
├── .dockerignore
├── .git
├── .gitignore
├── e2e
├── LICENSE
├── package.json
├── README.md
├── src
└── test
Backend Docker Image
Once your Dockerfile is ready, you can build the image.
$ docker build -t back .You can also list your image:
$ docker images back
REPOSITORY    TAG       IMAGE ID        CREATED          SIZE
back          latest    b8c7bb8dc6c4    2 minutes ago    918MB
Backend Docker Container
After having your Docker image for the backend, you can locally launch your first container using the command docker run <options> <name of the image>. The command must specify a mapping between ports. We already know that the application is running on port 3000 inside the container, hence; we can map to the same port in our host using the flag -p. We also assign a name mybackend
$ docker run -p 3000:3000 --name mybackend backIn order to check if the application is running, open your browser (or postman) and hit the following url (this endpoint will return the list of chat rooms available): http://localhost:3000/api/rooms.
Frontend
Our frontend is a web client for our backend server. The frontend application is a react application using redux and redux-sagas to handle side effects. The websocket frontend client is created with socket.io. It's using TypeScript instead of JavaScript.
The frontend application is also going to be containerized using Docker. We will begin creating .dockerignore file on the root folder project to avoid copying files that are not needed in the docker image.
./container-chat-front-example/.dockerignore
node_modules/
.gitignore
Dockerfile
License
Let's create the Dockerfile (at root folder level) with the necessary steps to build a Docker image of the front-end application. These steps will be:
- Base image
- Working directory
- Copy code
- Install dependencies
- Build production code
- Builder Pattern
- Web Server Configuration
1. Base Image
The first step will be to take node as base image:
./container-chat-front-example/Dockerfile
+ FROM node2. Working Directory
We will establish /opt/front as working directory:
./container-chat-front-example/Dockerfile
FROM node
+ WORKDIR /opt/front
3. Copy Code
Copy our source code:
./container-chat-front-example/Dockerfile
FROM node
WORKDIR /opt/front
+ COPY . .
4. Install dependencies
Install the dependencies using npm:
./container-chat-front-example/Dockerfile
FROM node
WORKDIR /opt/front
COPY . .
+ RUN npm install
5. Build production code
Build the production code transpiling our source code:
./container-chat-front-example/Dockerfile
FROM node
WORKDIR /opt/front
COPY . .
RUN npm install
+ RUN npm run build:prod
6. Builder Pattern
Right now, we are creating the image in one go. We will already have included several interim/temp files in the image; that's not ideal.We should only deliver the production files and save space in the final image.
Wouldn't it be better to copy the production code available in the dist folder and
ditch the rest of the image? We can use the Builder pattern for this purpose: A multi-stage Dockerfile where one stage can take advantage of the outcomes produced by others. Besides, we would like to use a better static web server, so; we will choose Nginx. Naming the build stages is very helpful when we have to copy files.
But what is Nginx? Well Nginx is open source software for web serving, reverse proxying, caching, load balancing... Here you can find more information
And why are we using Nginx? Well, Nginx scales really well and it has been battle-tested in these kinds of scenarios. Another good point is that, just using configuration files, we have complex server patterns such as reverse proxy. Why use nginx?
./container-chat-front-example/Dockerfile
- FROM node
+ FROM node AS builder
WORKDIR /opt/front
COPY . .
RUN npm install
RUN npm run build:prod

+ FROM nginx
+ WORKDIR /var/www/front
+ COPY --from=builder /opt/front/dist/ .
+ COPY nginx.conf /etc/nginx/
Dockerfile Summary
- We have created a temporary container to deal with the build process, notice that we're using an alias, builder:
FROM node AS builder
WORKDIR /opt/front
COPY . .
RUN npm install
RUN npm run build:prod- The built result is used to create our final nginx image:
FROM nginx
WORKDIR /var/www/front
COPY --from=builder /opt/front/dist/ .
COPY nginx.conf /etc/nginx/
7. Web Server Configuration
If we want to use Nginx, we need to create a configuration file which will indicate where the static files are (/var/www/front) that will be served and copied into the image. This file is called nginx.conf:
./container-chat-front-example/nginx.conf
worker_processes 2;
user www-data;

events {
  use epoll;
  worker_connections 128;
}

http {
  include mime.types;
  charset utf-8;
  server {
    listen 80;
    location / {
      root /var/www/front;
    }
  }

}
nginx.conf Summary
- worker_processes the dedicated number of processes.
- user defines the user that worker processes are going to use.
-
events set of directives for connection management.
- epoll efficient method used on linux 2.6+
- worker_connections maximum number of simultaneous connections that can be opened by a worker process.
-
http defines the HTTP server directives.
- server in http context defines a virtual server
- listen the port where the virtual server will be listening
- location the path from the files are going to be served. Notice that /var/www/front is the place where we copied the related built files.
The web server will work on port 80, which is the default port for http.
The final Dockerfile should look like this:
./container-chat-front-example/Dockerfile
FROM node AS builder
WORKDIR /opt/front
COPY . .
RUN npm install
RUN npm run build:prod

FROM nginx
WORKDIR /var/www/front
COPY --from=builder /opt/front/dist/ .
COPY nginx.conf /etc/nginx/
If you want to learn more about the commands used here check our post resources section.
The structure of the folder would be:
.
├── container-chat-back-example
└── container-chat-front-example
      ├── src
      ├── .babelrc
      ├── .dockerignore
      ├── .gitignore
      ├── Dockerfile
      ├── License
      ├── nginx.conf
      ├── tsconfig.json
      ├── tslint.json
      ├── webpack.common.js
      ├── webpack.dev.js
      └── webpack.prod.js
Front-End Docker Image
We are ready to produce the Docker image for the front-end application.
Set the current directory to front code root folder.
cd ./container-chat-front-example$ docker build -t front .You can also list your image:
$ docker images front
REPOSITORY    TAG       IMAGE ID        CREATED          SIZE
front          latest    a3cjbbbdg6cw    1 minute ago    102MB
Front-End Docker Container
We only need to launch our client application. Taking into account that the web server will run on port 80 and it will be called myfrontend, the command should be:
$ docker run -p 80:80 --name myfrontend frontNotice that we're using port 80 because it's default HTTP port protocol.
You can begin to chat: http://localhost:80/
High level diagram
A diagram that shows what we have built:
Improvements
localhost is meant for development purpose only. This may sound naive, but it's something that we will not work with in a deployed server environment.
Right now, the client application expects to find a server working locally in the port 3000. This is not an option for a distributed application, because the browser will never be in the same location as where the server is running. There are several approaches to improve this situation. The first one you can think of is to "change" the hard-coded url to the url where the server will be running. This approach solves the issue of not having the client in the same location as the server, but it adds the problem that the url of the server will be injected in the client code and the code should be changed, although by configuration, per deployment.
A better approach would be to reach the server through the same location as where the static files (client) were served. Depending on the visited url a front-end load balancer will forward the request to the client, to serve the static files, or to the server, to get data from the api or open a websocket.
From browser view we will have this:
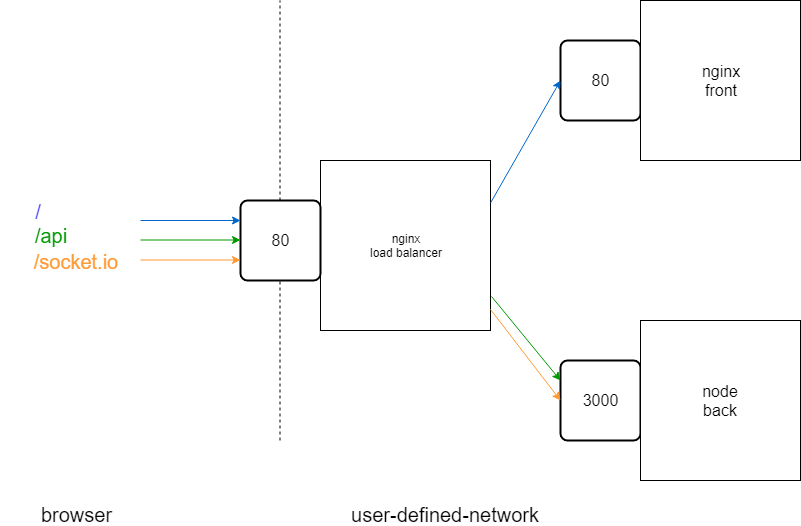
Notice how each color represents different fragment urls, that will be managed by the load balancer.
Let’s apply them:
The first step will be to type the back-end url into the front-end code replacing all const baseUrl = 'http://localhost:3000'; by const baseUrl = ''; which will work as relative url path.
- Modify ./src/pods/chat/sagas.business.ts as follows:
./src/pods/chat/sagas.business.ts
import { createSocket, SocketDescriptor } from './api';

export const establishRoomSocketConnection = (nickname: string, room: string) => {
- const baseUrl = 'http://localhost:3000';
+ const baseUrl = '';
  const socketParams: SocketDescriptor = {
    url: baseUrl,
    channel: room,
    options: {
      query: `user=${nickname}`
    },
  };

  return createSocket(socketParams);
};- Modify ./src/pods/lobby/api/routes.ts as follows:
./src/pods/lobby/api/routes.ts
import { Room } from "./model";

- const baseUrl = 'http://localhost:3000';
+ const baseUrl = '';
const baseApi = `${baseUrl}/api`;

export const roomsUrl = `${baseApi}/rooms`;
export const generateCanEnrollRoomUrl = (room: Room) =>
  `${roomsUrl}/canenroll/${room}/user`;
High level diagram
A diagram that shows what we are going to build:
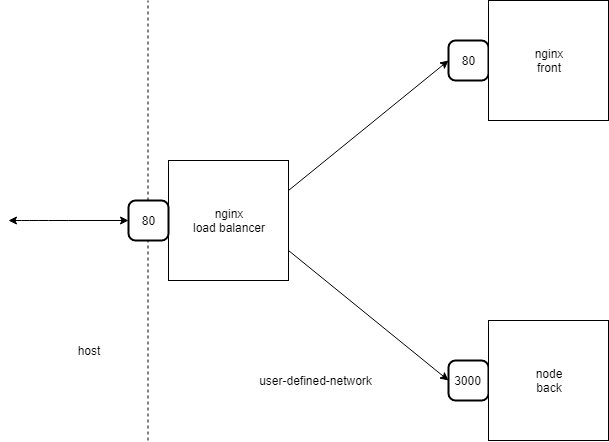
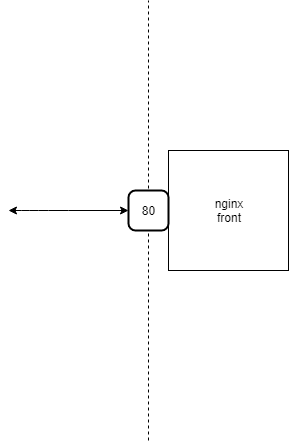
Nginx has been used in the front-end project to work as a web server, but it is a great tool that can also work as reverse-proxy and therefore, take the role of the load balancer. We have to indicate in the nginx configuration file (nginx.conf) how to redirect the traffic from a visited url to the container where the required app will be running. The load balancer will also be a Docker container.
The load balancer will be running on port 80 and we have to define three locations:
/: which will be redirected to the "front" app which is running on the port 80 to serve the static server./api: which will be redirected to the "back" app which is running on the port 3000 to serve data from the api./socket.io: which will be redirected to the "back" app which is running on the port 3000 to open websockets.
Let's start by creating a new folder, container-chat-lb-example to hold our new infrastructure. Our folder structure should look like this:
.
├── container-chat-back-example
├── container-chat-front-example
└── container-chat-lb-example
Create a new file, ./container-chat-lb-example/nginx.conf to place the new configuration:
./container-chat-lb-example/nginx.conf
worker_processes 2;

events {
    worker_connections 1024;
    use epoll;
}

http {

    upstream front {
        server front:80;
    }

    upstream back {
        server back:3000;
    }

    server {

        listen 80;

        location / {
            proxy_pass http://front;
        }

        location /api {
            proxy_pass http://back;
        }

        location /socket.io {
            proxy_pass http://back;
        }
    }
}
nginx.conf Summary
- upstream, defines a group of servers.
- propxy_pass, sets the protocol and address of the proxied servers. In our case, the ones defined in upstreams.
We need to create a new Dockerfile configuration to set up the load balancer. We only need to copy the configuration in a Docker image and its base has to be nginx. Create ./container-chat-lb-example/Dockerfile:
./container-chat-lb-example/Dockerfile
FROM nginx
COPY nginx.conf /etc/nginx/
After these steps our folder structure should look like this:
.
├── container-chat-back-example
├── container-chat-front-example
└── container-chat-lb-example
    ├── Dockerfile
    └── nginx.conf
To make it work, the three applications have to be running in the same Docker User-defined Network. To make it easy, in the following step we will work with Docker Compose.
Multi-Container
At this moment our distributed application has three containers, which isn't that many. As we have seen, however, that is something that can grow, and handling many containers can be tedious and even difficult although we are in a local environment. Besides, the three containers have to be able to reach each other, so they have to be in the same network. Docker Compose was created to solve these issues.
Install it here.
Docker Compose is a tool which helps us work in a multi-container environment, which is where we currently are. Docker Compose needs a .yml file, by default called docker-compose.yml, where the containers, grouped by services, and their features have to be specified. The steps to create our docker-compose.yml will be:
- Define Services
- Build Images
- Dependencies
- Expose Ports
Before getting started
Create a new file docker-compose.yml as sibling of container-chat-back-example, container-chat-front-example and container-chat-lb-example
The folder structure would be:
.
├── docker-compose.yml
├── container-chat-back-example
├── container-chat-front-example
└── container-chat-lb-example
1 Define Services
The name of the service can be used to reach it. If you remember the nginx.conf file, we wrote down that the front-end server was called "front" and the backend was called "back", therefore we need to name their services with these same words. Edit as follows ./docker-compose.yml:
./docker-compose.yml
+ version: "3.7"
+ services:
+   front:
+   back:
+   lb:
2 Build Images
The projects are locally stored, so we can indicate to Docker Compose where they are suppopsed to build the images, if they do not exist, before launching the containers.
./docker-compose.yml
version: "3.7"
services:
  front:
+   build: ./container-chat-front-example
  back:
+   build: ./container-chat-back-example
  lb:
+   build: ./container-chat-lb-example
3 Dependencies
The load balancer depends on the front and back applications; therefore it can't start up until the other two apps are up and running.
./docker-compose.yml
version: "3.7"
services:
  front:
    build: ./container-chat-front-example
  back:
    build: ./container-chat-back-example
  lb:
    build: ./container-chat-lb-example
+   depends_on:
+   - front
+   - back
4 Expose Ports
The chat application should only be accessible through the load balancer. Neither the front app nor the back app should expose any port. Otherwise, the load balancer should expose the port 80, standard http port, hence; we will map the port 80 of the load balancer container with the port 80 of the host.
./docker-compose.yml
version: "3.7"
services:
  front:
    build: ./container-chat-front-example
  back:
    build: ./container-chat-back-example
  lb:
    build: ./container-chat-lb-example
    depends_on:
    - front
    - back
+   ports:
+   - "80:80"
The final docker-compose.yml should look like this:
./docker-compose.yml
version: "3.7"
services:
  front:
    build: ./container-chat-front-example
  back:
    build: ./container-chat-back-example
  lb:
    build: ./container-chat-lb-example
    depends_on:
      - front
      - back
    ports:
      - "80:80"
docker-compose Summary
- version: "3.7" the format that will be applied on docker-compose. Depending on Docker Engine we will use a specific version. Compose file version references.
-
services these are the services that make up our application, so they can run together in an isolated environment
- front, this is our dedicated service for frontend.
- build: ./container-chat-front-example we specify the relative path to Dockerfile to build this service.
- back, this is our dedicated service for backend.
- build: ./container-chat-back-example we specify the relative path to Dockerfile to build this service.
- lb, this is our dedicated service for load balancer.
- build: ./container-chat-lb-example we specify the relative path to Dockerfile to build this service.
- depends_on: these are the list of services that this specific service relies on. We're declaring service dependencies, so these services will be built before this one.
- ports: the ports that are exposed to host.
Running The Multi-Container System
To run the entire system, we only have to execute the next command:
$ docker-compose upIf we want to rebuild the images whenever a change is introduced:
$ docker-compose up --buildNow click on the following link: chat and start to chat !!!
Conclusions
The applications have been containerized and with this approach we have unified:
- packaging
- shipping
- running / deployment
A Load balancer has been introduced in a simple way thanks to Nginx. The load balancer is the only one exposed, increasing the security of our applications which are isolated inside the Docker User-defined Network. In that way, the users will only be able to access the applications through there, and that is key to scale out the applications thanks to its reverse-proxy functionality.
Finally, docker-Compose helps us manage the set of containerized applications. It is amazing how easy it is to manage all the containers as a unique environment.
Trouble shooting
Windows
In a fresh start on a windows machine we can get the following error:
Error starting userland proxy: mkdir /port/tcp:0.0.0.0:3000:tcp:172.17.0.2:3000: input/output error.The easiest way to avoid this issue:
- If you're using Docker desktop, quit experimental features and restart Docker.
About Basefactor
We are a team of JavaScript experts. If you need coaching or consultancy services, don't hesitate to contact us.
Doers/
Location/
C/ Pintor Martínez Cubells 5 Málaga (Spain)
General enquiries/
info@lemoncode.net
+34 693 84 24 54


Copyright 2018 Basefactor. All Rights Reserved.

