

Setting up Bitbucket pipelines in a Front End project
The challenge
Bitbucket pipelines allows us to easily set up a continuous integration environment. In theory you only need to:
- Enable the Bitbucket pipelines in your project (Bitbucket portal >> choose project >> Setting >> Enable Bitbucket Pipelines).
-
Create a bitbucket-pipelines.yml file at the root of your project:
- Indicate the docker image that will be used as build environment (e.g. ubuntu + nodejs), Bitbucket will search for this image in docker-hub.
- Indicate when the build will be launched, e.g. on every push.
- Indicate scripts to be executed (e.g. npm install npm test).
- Commit and push this bitbucket-pipelines.yml file to your master branch and you are good to go. Bitbucket will automatically trigger a build whenever the specified conditions are matched. If the build fails, you will be notified via email (you can also check a CI dashboard).
That's great, but:
-
Bitbucket charges you by build minutes, and by default you get CI (Continuous Integration) triggered on every push, on any branch. We wanted to apply a cost-wise balance:
- Trigger the build on every push to master.
- Trigger the build on every pull request.
- Trying to configure a bitubucket YAML configuration can be an error-prone process (especially if you don't take your time to carefully read the documentation), we needed a quick way to check that the generated YAML is valid.
In this post we will check how to set up all this configuration starting from scratch and going step by step.
Step 1 Enabling pipes in our Bitbucket project
The project where we had already set up pipelines, is a standard web project (webpack + react + jest). We have the following scripts available on the package.json:
- start: to start the project.
- test: to run the unit tests.
On the build server we want to trigger the following commands sequence:
npm install
npm test
Step 2 Enabling pipelines in our project
Let's start by enabling Bitbucket pipelines in our project.
We have to navigate to our Bitbucket project, choose the project we want to enable and from there click on settings >> pipelines >> settings

Enable pipelines
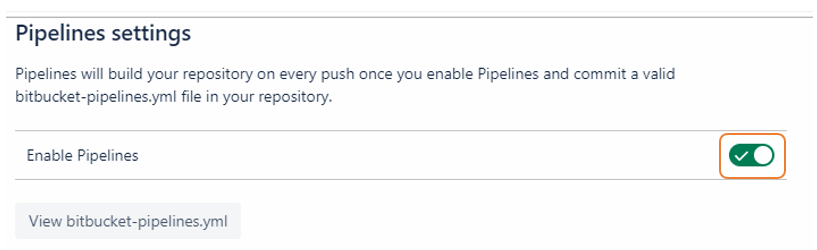
Now we only need to create a bitbucket-pipelines.yml config file at your project repository root folder in order to get CI up and running.
Step 3 Triggering CI on pushes to master
Let's start with the simplest case: I just want to trigger a new build whenever a given user pushes to master (that's a critical scenario: get notified as soon as master gets broken). Let's create the setup file at the root of our repo:
/bitbucket-pipelines.yml
image: node:10.15.0

pipelines:
  branches:
    master:
      - step:
          caches:
            - node
          script:
            - npm install
            - npm test
It would be a good idea to add a npm run build step to ensure our bundle is generated with no errors.
What's going on here?
- First, we are pointing to Bitbucket pipelines to run the build using a given image from docker hub (in this case a linux instance that has already installed nodejs 10), in this link you will find more info about pipelines and how to use docker images.
- Then we are adding a configuration to indicate that we want to trigger a new build just for the branch master.
- In the previous scenario we instruct the scripts that we want to execute (first install the project packages by running npm install then execute the tests by running npm run test).
We are using a setting to speed up the build process (and save build minutes $$$) by caching npm packages, check the section caches node, more info about it in this link.
Let's commit and push this file to our master branch.
Great, now if we make an update on master and push it, a build will be triggered and if any of the tests fail, we will receive an email indicating that the build has failed (we can also check the bitbucket project portal, there's a section available to check the build status).
Step 4 Triggering a build on Pull Requests
That was good, but wouldn't it be great to fire a new build whenever a feature branch pull request is raised? That way we can detect faulty code before merging into master.
In order to do that we only need to add a new section to the previous yml that we have created
image: node:10.15.0

pipelines:
+    pull-requests:
+        '**':
+          - step:
+             caches:
+               - node
+             script:
+               - npm install
+               - npm test
    branches:
      master:
        - step:
            caches:
              - node
            script:
              - npm install
              - npm test
In this case we are instructing:
- For every pull request.
- On any branch (if you need to fine-tune this, you can apply fileglob patterns, for instance: just apply to feature branches, would be replacing "**": with something like: "feature/*":).
- Execute a new build (npm install / npm test).
The resulting yml:
image: node:10.15.0

pipelines:
  pull-requests:
    "**":
      - step:
          caches:
            - node
          script:
            - npm install
            - npm test
  branches:
    master:
      - step:
          caches:
            - node
          script:
            - npm install
            - npm test
Resources
Bitbucket YAML pipelines configuration seems easy, but pinpointing an error is not straightforward. Bitbucket provides you with an online validation tool.
If you need more info about how to fine-tune builds on pull request, you can check this link.
If you need to make a specific configuration, you can always dive into the official docs
Wrapping up
Bitbucket pipelines + YAML offers you great power, but it may take a while to get to know the nuts and bolts of the technology. In this post we have tried to cover a common scenario and let you configure your CI process in minutes. We hope you have enjoyed it.
About basefactor
We are a team of JavaScript experts. If you need coaching or consultancy services, don't hesitate to contact us.
Doers/
Location/
C/ Pintor Martínez Cubells 5 Málaga (Spain)
General enquiries/
info@lemoncode.net
+34 693 84 24 54


Copyright 2018 Basefactor. All Rights Reserved.

